How to Customize, Add Adsense Ads, and Fix Errors from AMP Pages : Tips for WordPress Sites
AMP stands for Accelerated Mobile Pages, also known as Google AMP HTML Pages. AMP Page feature for blogs and websites was brought earlier to improve Users’ experience while visiting the website from Mobile devices. AMP is an open source project that removes all the clutter from the webpage, and let users enjoy smooth browsing. AMP pages also consume very fewer data that could be very beneficial for those who have a limited data plan. AMP is an open source project that doesn’t cost anything if you want to setup for your blog. But, many Bloggers and Webmasters never enabled AMP for their blog, because there wasn’t any way to add Adsense and other ad tags to AMP pages. So visitors were able to enjoy fast and smooth browsing, but Bloggers were losing potential earning. No longer now! You can add ads on AMP Pages now, and keep earning.
Before you add ads on AMP pages, you should customize it to make look awesome, and then you can apply ads on the pages. There is one WordPress Plugin that can do both the work.
Note : First of all, you must add AMP plugin to your WordPress blog, and then follow below mentioned steps. The Plugin we have mentioned below works like an add-on, so the original AMP plugin must be enabled to make Ads and Customization work.
Get the Plugin download link and AMP page Setup guide in this article : How to Setup AMP Pages.
How to Resolve AMP Page Error that Webmaster Tool Shows Under Your Account or In Search Result?
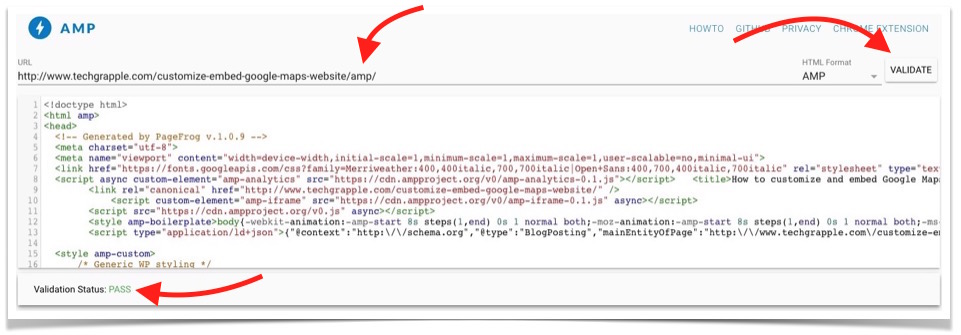
AMP Pages mean to load fast. If you are using only Default/Original AMP plugin on your Wordpress Blog, you must have noticed AMP Error under your Webmaster Account. Google Also shows AMP Page error in the search result for your blog when you are logged in. You can validate an AMP Page for Error to find the issues. Follow these steps to Validate;
- Visit validator.ampproject.org.
- Enter the URL in the URL field. Make sure the URL has /amp/ in the end, e.g. https://www.techgrapple.com/customize-embed-google-maps-website/amp/.
- Then click on Validate option.
- If there is an error, you will see the Error, else it will show Pass.
- How to fix Error : Follow the customization steps we have mentioned below, and the error will be removed automatically.
How to Customize AMP Pages and Add a Logo
Update : We have found a better plugin for you. It allows to customize AMP pages, add related posts, menu, Adsense Ads, Social Sharing Buttons etc.. Read the article now.
Update ends
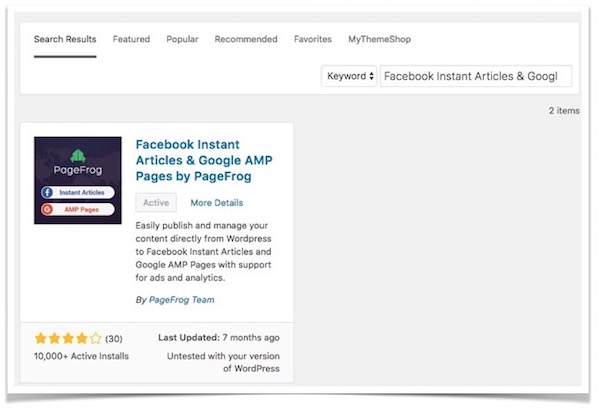
- Add a free WordPress Plugin “Facebook Instant Articles & Google AMP Pages by PageFrog” to your blog or website, and activate it. This plugin allows to manage FaceBook Instant Article as well, but we will talk about AMP only.
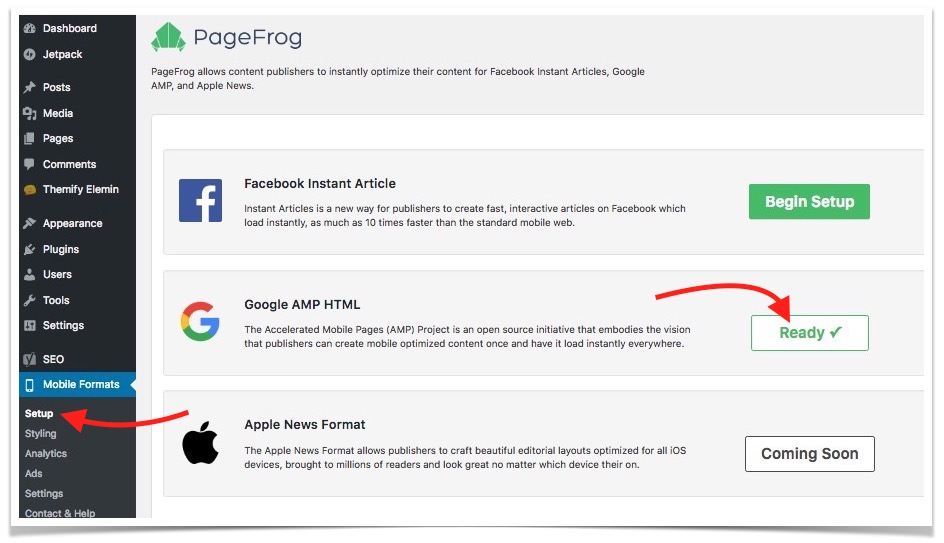
- Once the Plugin is Activated, click on Mobile Formats option under Admin Panel, and you should be under Setup option. Please Make Sure Google AMP HTML is showing Ready. If you have not activated original AMP plugin, it will show Activate option, and you can click on Activate to enable it.
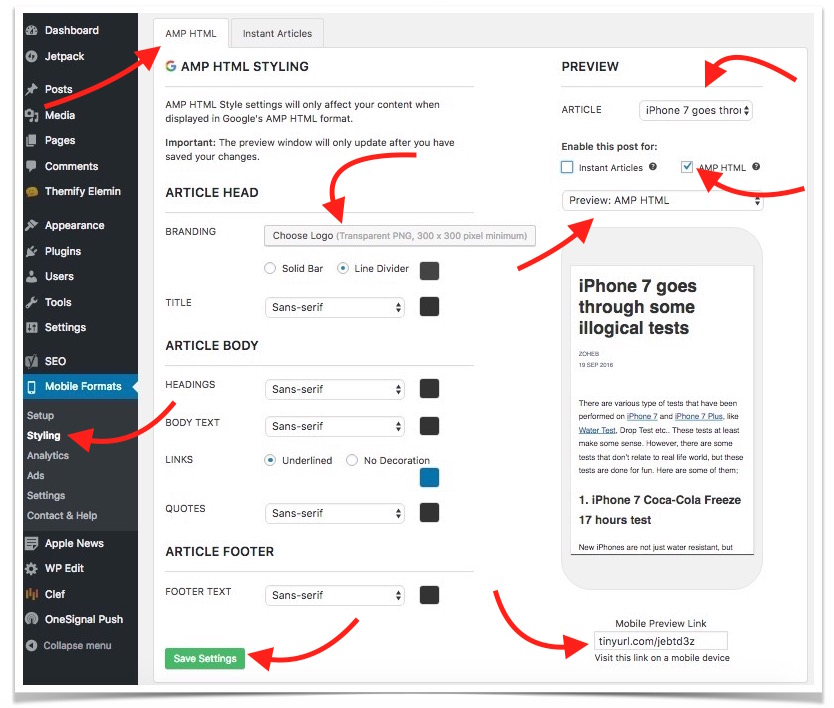
- Once enabled, click on Styling option under Mobile Formats. Now you will have many options to Play with.
- Make Sure you are under AMP HTML tab.
- Add Logo : Click on Choose Logo option located as Branding option. Select a logo from already added media file or upload a new one.
- You can see the preview of AMP pages by selecting any of the articles from the drop-down list (located on the right along with Mobile Screen). You can also use preview link to see AMP page preview on a computer. AMP Page Preview will also be shown when you write a new post.
- Select the font type and color according to your desire.
- You may see featured image on the top of the article. If you don’t want it, it can be removed in the next step.
- Now Save the settings.
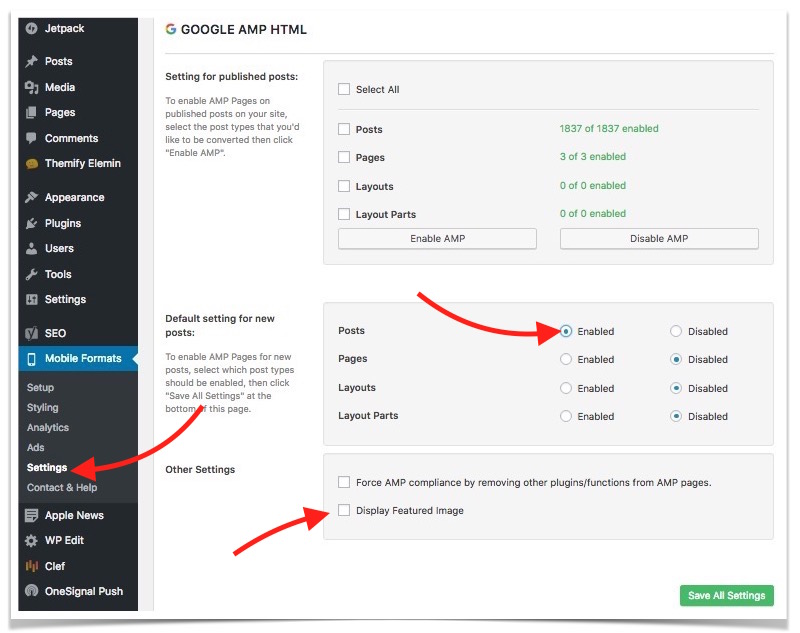
- Next step is to click on Settings option under Mobile Formats, and you will have the following screen.
- Remove Featured Image : If you don’t want articles to show featured image on the top of the article, uncheck Display featured image option.
- Under Default Settings for new posts, keep at least Posts option enabled, so it can make AMP page for new posts automatically. Now Save the settings.
Note : You can preview any Posts for AMP compatibility by adding /AMP/ in the end of the URL, e.g. https://www.techgrapple.com/apple-a10-cpu-cores/amp/.
How to Add Adsense Ads on AMP Pages
Method -1
Use this Addition AMP Plugin along with original AMP Plugin to Add Adsense to many places on a single post. It also allows to add related articles, social sharing buttons, comments etc. on AMP Pages.
Method-2
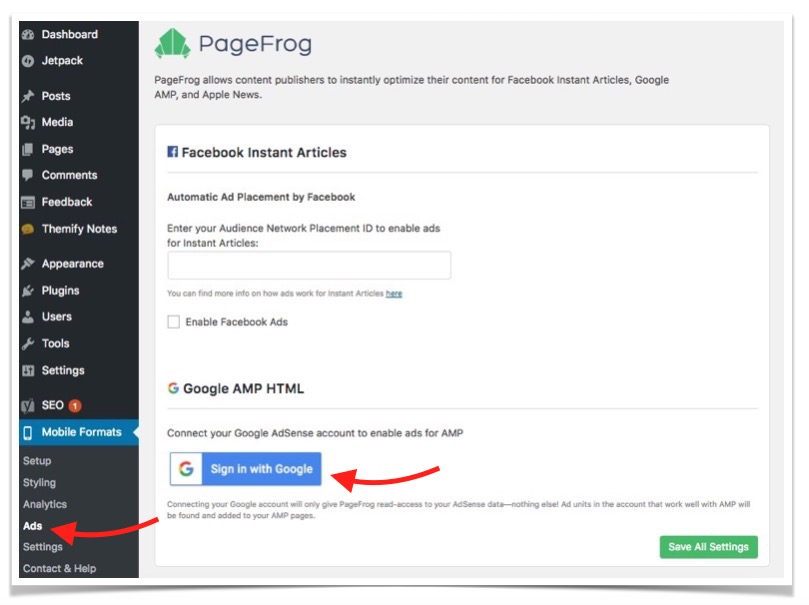
- After you are done with the customization, click on Ads option under Mobile Formats, and select Ads.
- Select the option “Sign in with Google.” Login to your Google Account, and authorize.
- Now you will see you Adsense Account on the screen, click on Choose option.
- It will now show you all the Ad Banner you have created on Adsense, along with banner name, ad dimension and Ad Slot number. If you don’t find a Suitable one, you can go to Adsense, create a new one and come back to WordPress.
- Select the Ad Banner you want to use on AMP Page by clicking on Choose option.
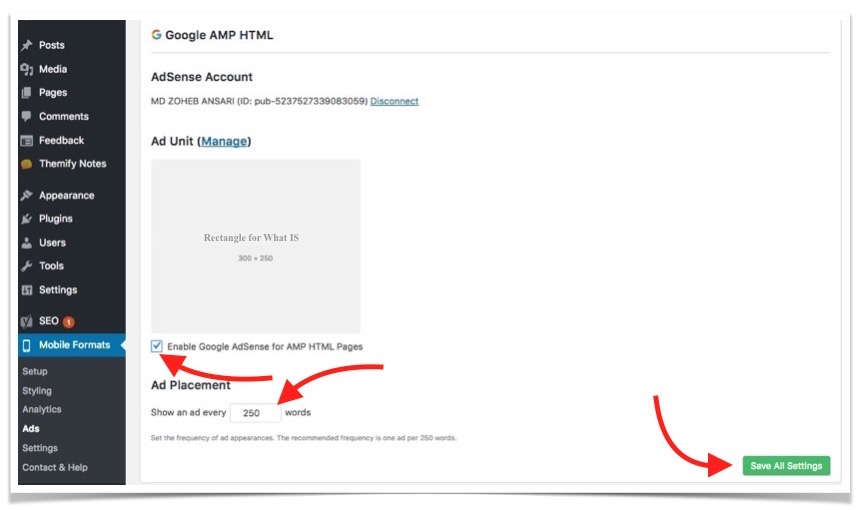
- Now enable the option “Enable Google Adsense for AMP HTML Pages.”
- Show an Ad every “words” : By default, AMP page will show an Ad every 250 words. You can change the word count if you want. However, do remember that 2 Ads should not appear at the same time on Mobile Screen. It is against Adsense Policy.
- That’s it and now Adsense Ads will appear on AMP Pages.
What happens if an Article has more than 1000 words, Serving more than 3 banners is against Adsense Policy
Yes, you are allowed to serve maximum 3 Ad Banners each page. However, this plugin is very smart. You don’t need to worry. I have tested and found that it doesn’t serve more than 3 Ads each page regardless of how many words an article contains. Here are 2 examples of my AMP Webpage;
Method 3
Use any code inserter tool, like Quick Adsense, and add the ad tag to serve ads just like you normally do on your blog. You can add the ads anywhere you want. Use the following ad code.
<amp-ad width="300" height="250"
type="adsense"
data-ad-client="ca-pub-XXXXXXXXXXXXXXXX"
data-ad-slot="XXXXXXXXXX">
</amp-ad>
Replace ca-pub-xxxxx and data-ad-slot with your Adsense codes. You must choose an ad with fixed width and height. AMP currently doesn’t support responsive banner.
For example, you are already serving ads at the beginning and end of the article using Adsense Script, you can still place the above-mentioned code along with those ads code, so they both will appear together. But, Webpages will show Adsense Ads (the one with the script), and AMP pages will show AMP Ads. Both will not appear at the same time. so you have nothing to worry.
Why AMP Validator Still Shows AMP-AD error?
How do I fix “The tag ‘amp-ad extension .js script’ is missing or incorrect, but required by ‘amp-ad’. This will soon be an error” error.
After adding Adsense Ads to AMP Page, you will see the error when you test on the validator. Follow these steps to fix it.
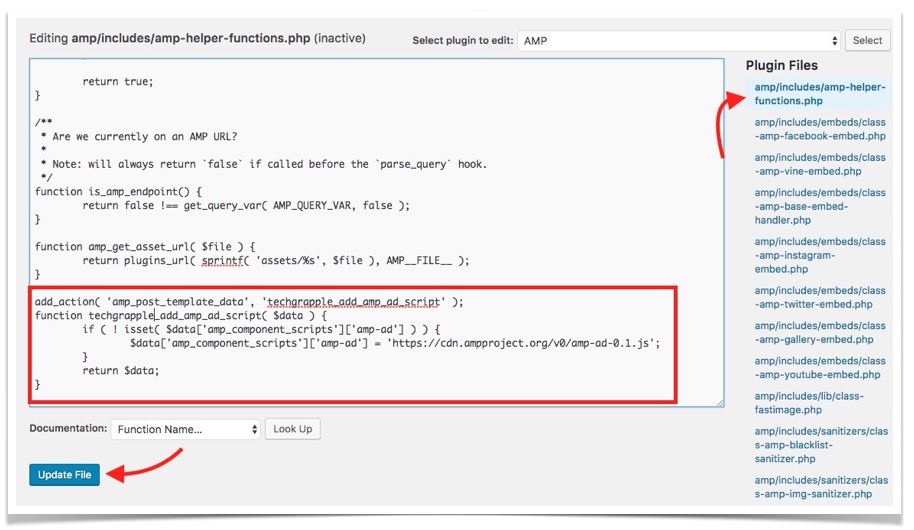
- Go to WordPress Plugins page where you will see all the installed plugins.
- Click on Edit option associated with AMP plugin.
- Select amp/includes/amp-helper-functions.php on the right.
- Add the following code in the end, and click Update file option. (You can replace abc with anything).
add_action( 'amp_post_template_data', 'abc_add_amp_ad_script' ); function abc_add_amp_ad_script( $data ) { if ( ! isset( $data['amp_component_scripts']['amp-ad'] ) ) { $data['amp_component_scripts']['amp-ad'] = 'https://cdn.ampproject.org/v0/amp-ad-0.1.js'; } return $data; }



October 24, 2016 @ 2:23 am
Can you teach me how to add few related posts at the bottim with similar process. I use Pagefrog and AMP plugins only. I have tried many plugins but they don’t help. Is theme any similar method or code. Can we also add few social icons.
October 24, 2016 @ 8:54 am
Created a Matched Content Ad Unit for your Adsense Ads, and then follow Method 2 given in this article, and add the Ad Unit code in the end of the post. You can use Quick Adsense Plugin to add matched content ad unit or even Adsense Ads to the end of the post.
October 24, 2016 @ 10:38 am
Thanks for the reply but problem is, I don’t have access to matched content. So can you give me any other solutions
October 24, 2016 @ 3:59 pm
Here is the solution to your problem : http://www.techgrapple.com/related-posts-menu-social-sharing-amp-pages/
October 25, 2016 @ 11:17 am
Thanks man
October 25, 2016 @ 6:01 pm
hey bro, how user automatically using amp ?
October 25, 2016 @ 6:36 pm
Can you please clarify the issue?
October 25, 2016 @ 9:57 pm
how user from google search engine open automatically my blog (amp version) with this url myblogmyblog.com/blogpost/amp ?
sorry, my english is bad
October 25, 2016 @ 10:25 pm
You can’t make anyone visit your AMP page from Google Search. If your website usage AMP, Google will show it on Search Engine automatically when someone browse using a Mobile Device (Provided that it is ranked with that keyword). AMP pages show AMP mark (Energy sign). Have a look at the screenshot.
https://uploads.disquscdn.com/images/8e5c2ee501232238bb3bdbfd76af7a52ba0a24a6c903d7f66404da090611fed1.png
Make sure your have setup AMP correctly. Use AMP Validator mentioned in this article to test.
October 26, 2016 @ 12:27 am
thanks bro..
November 21, 2016 @ 8:06 am
nice post