How to Convert Images on Mac OX (e.g. PNG to JPEG or Other Formats)
Mac comes with many different tools that let you save files in different formats and even convert them into desired formats. Earlier we explained how you can create MS Office Compatible Files on Mac, and now we will tell you how you can deal with images in different formats, convert them, and reduce image size.
What do you do to Compress an Image?
Compressing an image means reducing its resolution, quality, format etc.. For example, If you have an image in PNG format, you can convert it to JPEG to reduce the size of the image and also adjust the quality while converting. If that is not enough, you can decrease the pixels/resolution of the image.
How to Convert Images on Mac (Convert PNG to JPEG or JPEG to PNG or in various formats) and Compress Images to reduce its size
I have an image on my Computer that is named as Trees.png that weighs 3.3MB. I want to send multiple images on such type to one of my friends, but my email has got restriction to send the specified size of the attachment. However, I don’t want to use some crappy conversion tool that destroys the image quality completely. We all know that the best option is to convert that PNG file to JPEG, but how to do it on Mac without any third party tool?
Follow these steps to Convert a PNG File to JPEG or any other format
- Open the image on Mac that you want to convert (It should be opened with Preview app by default)
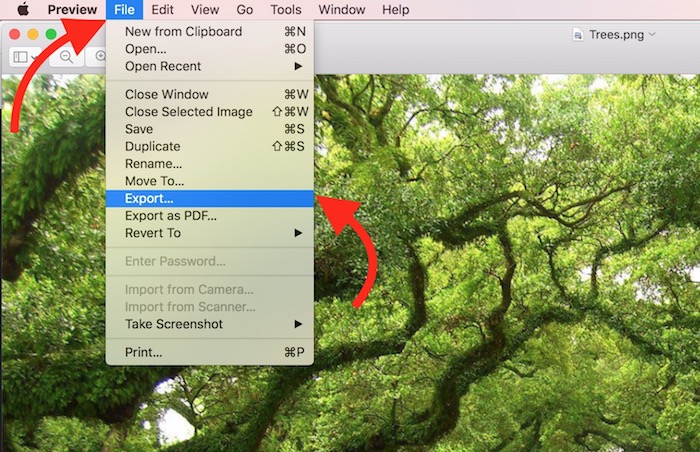
- Now click on File option, and then select Export
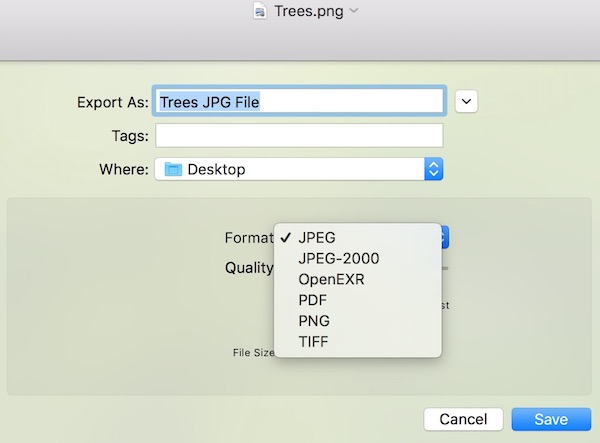
- Now a new window will open with some options. You can name the file first and then Choose a format for the file. The conversion Option on Mac allows converting any Image file to PNG, JPEG, JPEF-2000, OpenEXR, TIFF, and You can even convert to a PDF file or a PDF to JPEG.
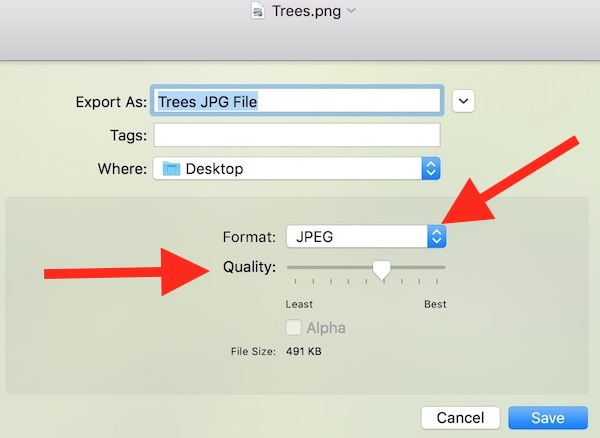
- I will select JPEG here, because this option is supported by most of the devices as well as internet browsers. After selecting the JPEG option, you can also adjust the quality to compress the image even in a better way. Don’t worry, you will always have the original file as it doesn’t replace original image. So you can come back and do it again.
- After selecting the format and adjusting the quality, click the Save option and check the output going to the folder where you have saved. If you are happy with the quality, that’s well and good, else you can repeat the procedure and adjust quality again. The default quality what Mac select itself is the best that compress the image and also convert it.
- You have successfully compressed the image after conversion and its size is reduced by more than 600%.
When You cannot convert: If you have a transparent PNG file, you cannot convert it. If you do so, the image will lose its transparency.
How to compress images by reducing its pixels/resolution on Mac
- Launch the image on Mac
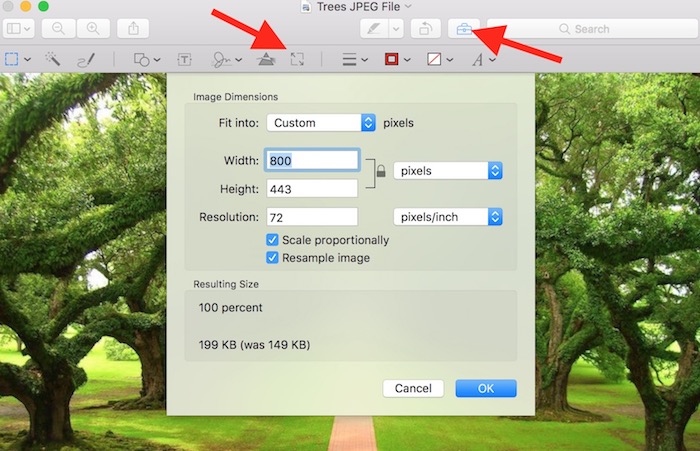
- Click on the Tool icon and then hit the image resize icon
- Now you can adjust the pixels of the image and its resolution
Here is the video with demo


