Top Free and Open Source Hosting Control Panels: 2025 List

Understanding these hosting control panels can help manage web servers in an easier way. They help control websites, emails, domains, and other tasks through a simple web dashboard. They work on a server that runs Linux. They replace the need to type complicated commands. They help people who own their own servers or small hosting companies. They save time and reduce confusion.
If you are looking for cPanel & WHM, Plesk, or DirectAdmin alternative, but can’t afford to pay for it, keep reading. These control panels do not cost money. They allow anyone to use and change their code. Their communities help fix errors and make improvements. They come with helpful tools that manage everything in one place. Users add domains, create email accounts, install apps, and check logs. Some look modern and simple. Some have more features. Some use fewer resources. Some include tools for easy backups or security settings.
Different panels work in different ways. Some come with many features built inside. Others focus on doing a few tasks well. Some have a fresh look that feels simple. Others have a look that feels older. It helps to choose one that fits personal style, skill level, and server size.
Below are some of the most popular free and open-source panels. Each section explains what makes them special, their main features, how they feel to use, what they need to run, and how to install them. Each section tries to use simple words and short steps.
After going through them, a table will show a simple rating for ease of use, speed, ability to customize, and feature set. These are not official ratings. They are just a way to compare at a glance. Actual results depend on the server and the person using it.
Free Alternatives to cPanel, Plesk, Direct Admin
Note: The installation command given here may update over time and it may differ depending on the system you use. It’s better to visit official site and check for the latest installation command.
CyberPanel
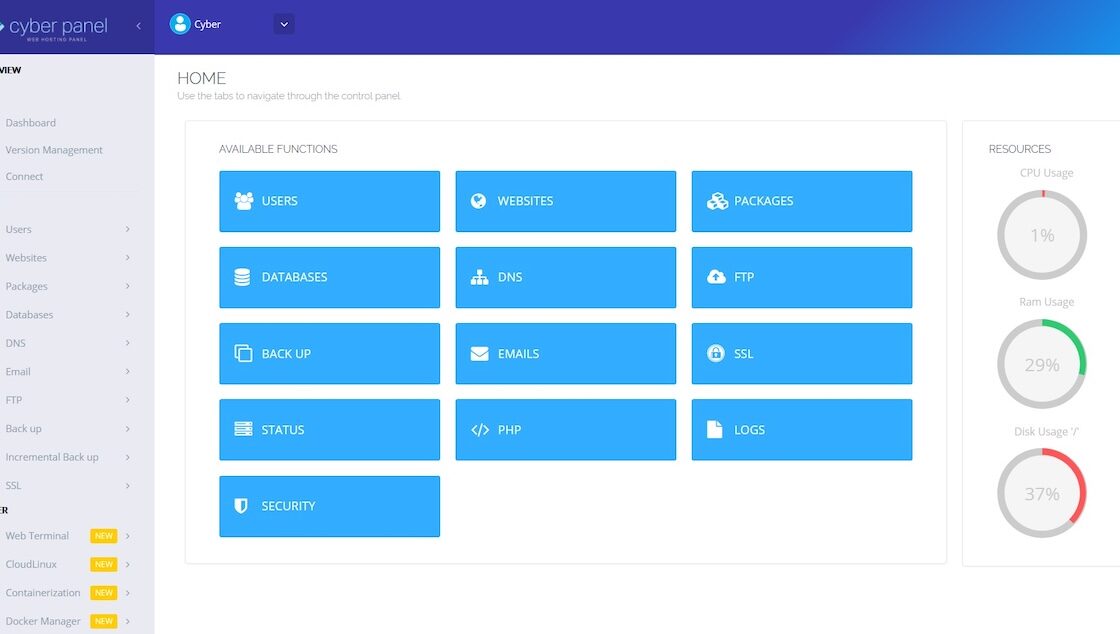
CyberPanel helps manage websites that use the web server called OpenLiteSpeed. It also supports LiteSpeed Enterprise. It includes a simple interface. It comes with tools to install apps with one click. It supports SSL certificates for security. It also manages email accounts, backups, and DNS records. It has a soft and clean design. Beginners find it easy to manage.
Supported Systems
- Ubuntu, Debian, AlmaLinux, Rocky Linux, and CentOS.
Main Features
- Add and manage many websites
- Create email accounts and handle spam filters
- Enable SSL certificates
- Install apps like WordPress with one click
- Manage DNS and backups
Performance
CyberPanel uses OpenLiteSpeed, which consumes fewer resources than many other web servers. This helps it load sites quickly and perform well even on small servers.
Ease of Use
The menu looks clean and modern, with icons that guide users. Most tasks require just a few clicks. Beginners find it intuitive.
Pros
- Fast performance with OpenLiteSpeed
- Beginner-friendly design
- Supports advanced caching and LiteSpeed Enterprise
Cons
- Limited to LiteSpeed servers
- Some features may feel too specific for general users
Installation Steps
- Start with a fresh Linux server.
- Update the server system packages, download the install script, and run it:
sudo apt update && sudo apt upgrade
wget -O installer.sh https://cyberpanel.net/install.sh
sudo bash install.sh- Select OpenLiteSpeed or LiteSpeed Enterprise during the installation process.
- Wait for the installation to complete.
- Access the panel by visiting your server’s IP address and port 8090.
- Log in with the credentials provided at the end of the installation.
aaPanel
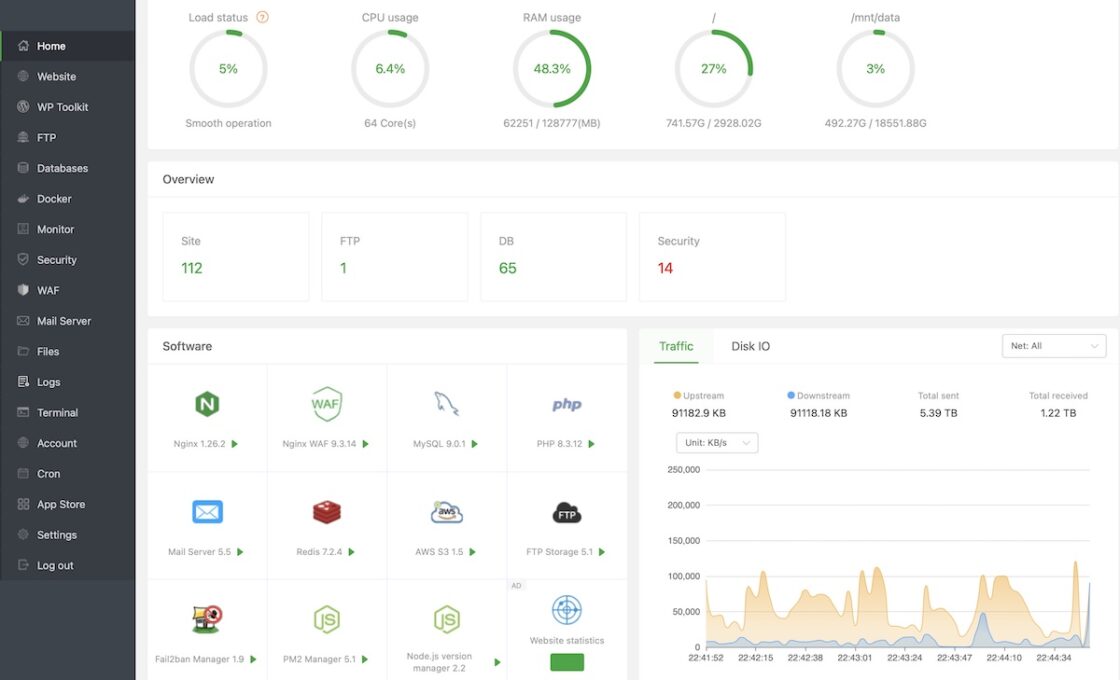
aaPanel helps manage servers with a simple and nice interface. It supports many web servers, such as Apache, Nginx, and LiteSpeed. It also supports paid plugins to extend functionality. It comes with one-click installers for apps. Users manage databases, DNS, email, and files. It has a built-in file manager and includes modules for backups and security.
Supported Systems
- CentOS, Ubuntu, Debian, AlmaLinux.
Main Features
- Add and manage websites with Apache, Nginx, or LiteSpeed
- Create and manage databases
- Handle DNS settings
- Add SSL certificates
- Install common web apps easily
- Manage files with a web-based file manager
Performance
aaPanel performs well on small or medium servers. It remains stable, with smooth functionality even when running multiple services.
Ease of Use
The interface is modern and easy to navigate. The menu layout is clear, with well-labeled buttons. Beginners appreciate its friendly design.
Pros
- Supports multiple web servers
- Modern and clean UI
- One-click installer for apps
- Flexible with both free and paid options
Cons
- Some plugins require payment
- Features can feel overwhelming to complete beginners
Installation Steps
- Start with a clean Linux server.
- Update system packages, download aaPanel installation script, and run the script:
sudo apt update && sudo apt upgrade
wget -O install.sh http://www.aapanel.com/script/install-ubuntu_6.0_en.sh
bash install.sh- Once complete, the script will display the login URL and credentials.
- Open the URL in a browser and log in.
- Choose a web server stack to install (e.g., LAMP, LNMP).
- Start adding websites, apps, and configuring settings.
Webmin and Virtualmin

Webmin controls many parts of a server and is highly flexible. Virtualmin is a plugin that adds hosting-specific features to Webmin, forming a robust and comprehensive control panel. Together, they manage websites, emails, databases, and DNS. They are suitable for users who want granular control over server configurations.
Supported Systems
- Debian, Ubuntu, CentOS, AlmaLinux, and Rocky Linux.
Main Features
- Add and manage domains
- Create and manage email accounts
- Control web servers like Apache or Nginx
- Manage DNS records and SSL certificates
- Adjust server settings with extensive customization options
Performance
Webmin and Virtualmin are lightweight and scale well. They can handle multiple websites efficiently when properly configured.
Ease of Use
The interface feels outdated, and the menus have many options, which can overwhelm beginners. However, experienced users appreciate the depth of features.
Pros
- Extremely flexible and customizable
- Lightweight with good scalability
- Active community support
Cons
- Outdated interface design
- Steep learning curve for beginners
Installation Steps
- Start with a fresh Linux server.
- Update system packages, download the Virtualmin install script, run the script:
sudo apt update && sudo apt upgrade
wget http://software.virtualmin.com/gpl/scripts/install.sh
sudo bash install.sh- Follow the prompts during installation.
- Access the panel by visiting your server’s IP address and port 10000.
- Log in with your root credentials.
- Complete the setup wizard to configure the panel.
ISPConfig
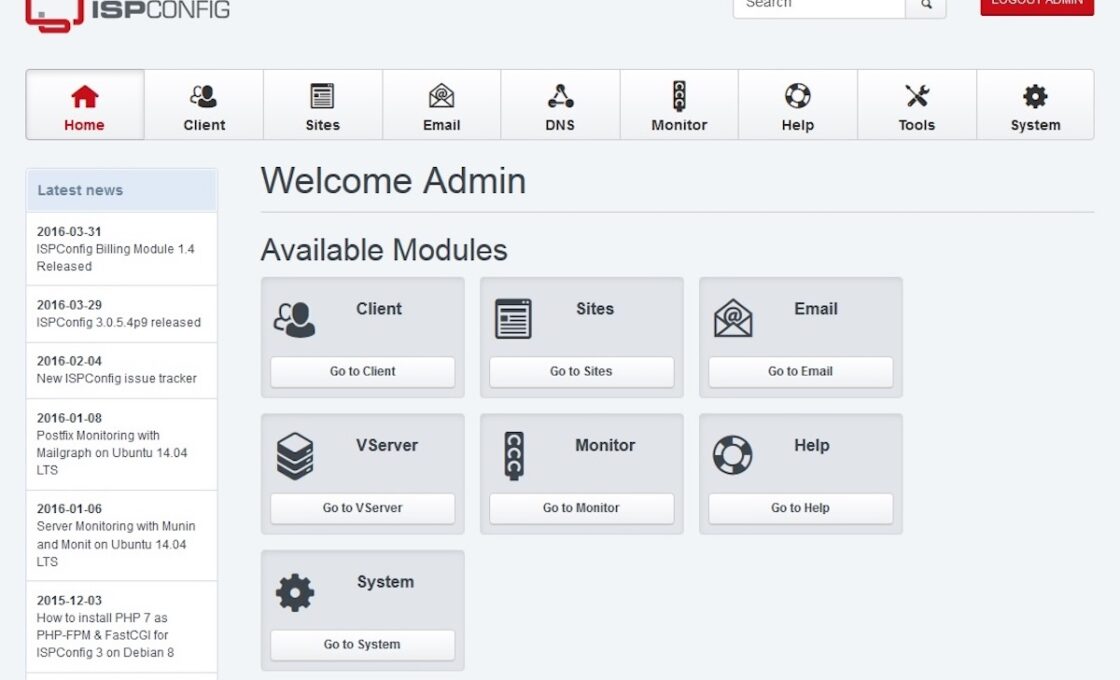
ISPConfig is a reliable panel for hosting multiple websites, email domains, DNS, and FTP accounts. It focuses on stability and essential hosting features.
Supported Systems
- Debian, Ubuntu, CentOS, AlmaLinux.
Main Features
- Manage multiple websites
- Create and manage email accounts
- Configure DNS records
- Set up FTP accounts
- Integrate with Apache or Nginx web servers
Performance
ISPConfig is efficient and uses minimal resources, making it suitable for smaller servers or shared hosting environments.
Ease of Use
The interface is straightforward and organized, though it appears dated. Users can quickly learn to navigate its features.
Pros
- Lightweight and stable
- Ideal for managing multiple websites
- Works well with both Apache and Nginx
Cons
- Dated interface
- Lacks advanced features found in more modern panels
Installation Steps
- Prepare a Linux server with essential components like Apache or Nginx and a database server.
- Update the system packages, download the ISPConfig auto-installer script,run the script as root:
sudo apt update && sudo apt upgrade
wget -O ispconfig-auto-installer.sh https://get.ispconfig.org
sudo bash ispconfig-auto-installer.sh- Follow the on-screen instructions during installation.
- Access the panel by visiting your server’s IP address.
- Log in and begin adding websites, email accounts, and more.
Ajenti
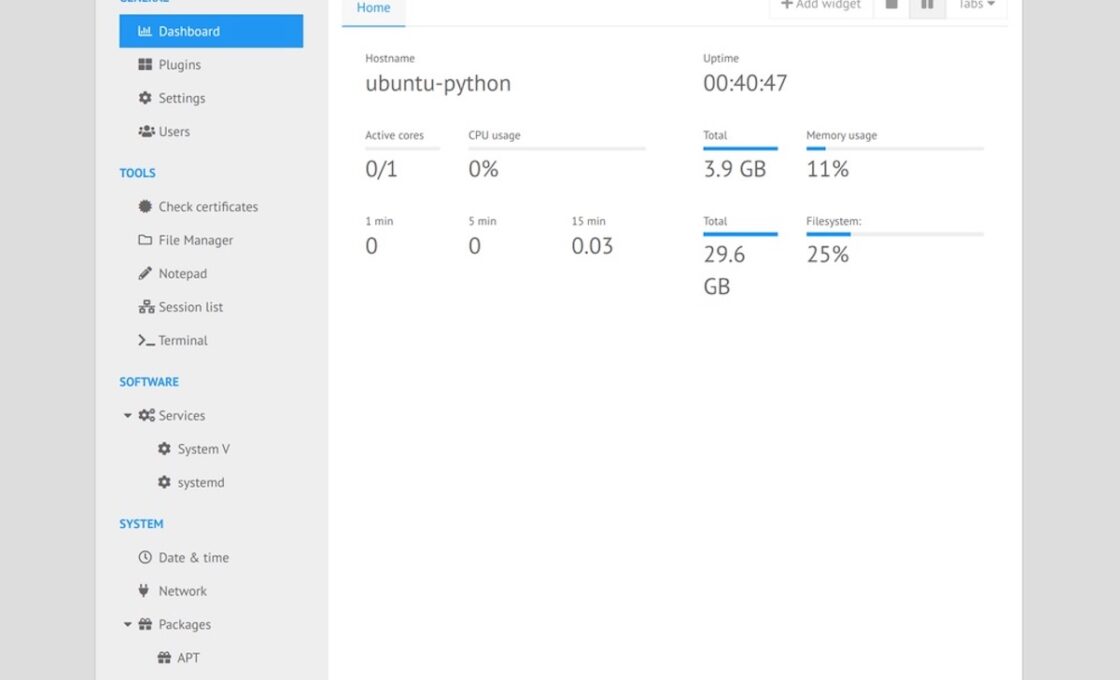
Ajenti offers a modern interface and simplifies server tasks. It is lightweight, and with the Ajenti V plugin, it gains hosting-specific features.
Supported Systems
- Debian, Ubuntu, CentOS.
Main Features
- Manage websites with Ajenti V
- Handle email accounts
- Configure DNS with additional modules
- Monitor server performance through graphical displays
- Manage web server software (Apache, Nginx)
Performance
Ajenti uses minimal resources, even with Ajenti V installed. It performs well on small servers and remains responsive.
Ease of Use
The interface is clean, with simple navigation. New users enjoy the minimal menus and straightforward layout.
Pros
- Modern and clean design
- Lightweight and efficient
- Simple server management tools
Cons
- Limited advanced hosting features
- Relies on plugins for full functionality
Installation Steps
- Start with a fresh Linux server.
- Update the system packages, add Ajenti’s repository, install Ajenti, and start the service:
sudo apt update && sudo apt upgrade
wget -O- https://repo.ajenti.org/debian/key | apt-key add - echo "deb http://repo.ajenti.org/ng/debian main main" > /etc/apt/sources.list.d/ajenti.list
apt update && apt install ajenti
systemctl start ajenti- Access the panel at your server’s IP address on port 8000.
- Log in using the default username “admin” and password “admin.”
- Install Ajenti V if needed and start configuring hosting features.
CentOS Web Panel (CWP)

CentOS Web Panel focuses on CentOS and compatible distributions. It includes numerous tools, offering features similar to paid control panels.
Supported Systems
- CentOS, AlmaLinux, Rocky Linux, Ubuntu.
Main Features
- Manage Apache or Nginx web servers
- Add email accounts and DNS records
- Handle MySQL or MariaDB databases
- Set up advanced security tools like CSF firewall
- Perform automated backups
Performance
CWP uses more resources due to its many features. It works best on servers with sufficient memory and processing power.
Ease of Use
The interface is modern but crowded. While it offers many features, beginners may find the layout overwhelming.
Pros
- Comprehensive set of tools
- Supports Apache and Nginx
- Includes security and automation options
Cons
- Requires more server resources
- Overwhelming for new users
Installation Steps
- Start with a fresh system, preferably CentOS or AlmaLinux.
- Update system packages, download the CWP installer, and run the installer:
yum update -y
wget http://centos-webpanel.com/cwp-el7-latest
sh cwp-el7-latest- After installation, reboot the server.
- Access the panel at your server’s IP address and port 2030.
- Log in as root and complete the setup.
VestaCP

VestaCP is a lightweight panel known for its simplicity and speed. It balances core hosting features with a clean interface, making it an excellent choice for small servers.
Supported Systems
- Debian, Ubuntu, CentOS.
Main Features
- Add and manage websites, email accounts, and DNS zones
- Install SSL certificates easily
- Manage FTP accounts
- Integrate caching for improved performance
- Provide a CLI for advanced users
Performance
VestaCP is resource-efficient and remains fast even on smaller servers. It is ideal for hosting a few websites with light to medium traffic.
Ease of Use
The interface is neat, with uncluttered menus. Its simplicity makes it accessible for beginners.
Pros
- Lightweight and fast
- Simple and clean UI
- CLI support for advanced users
- Easy SSL integration
Cons
- Limited scalability for larger projects
- Minimal customization options
Installation Steps
- Start with a fresh Linux system.
- Update system packages, download the VestaCP, and finally run the installer:
sudo apt update && sudo apt upgrade
curl -O http://vestacp.com/pub/vst-install.sh
sudo bash vst-install.sh- Follow the on-screen prompts to customize the setup.
- After completion, access the panel at your server’s IP and port 8083.
- Log in with the admin credentials displayed by the installer.
Sentora
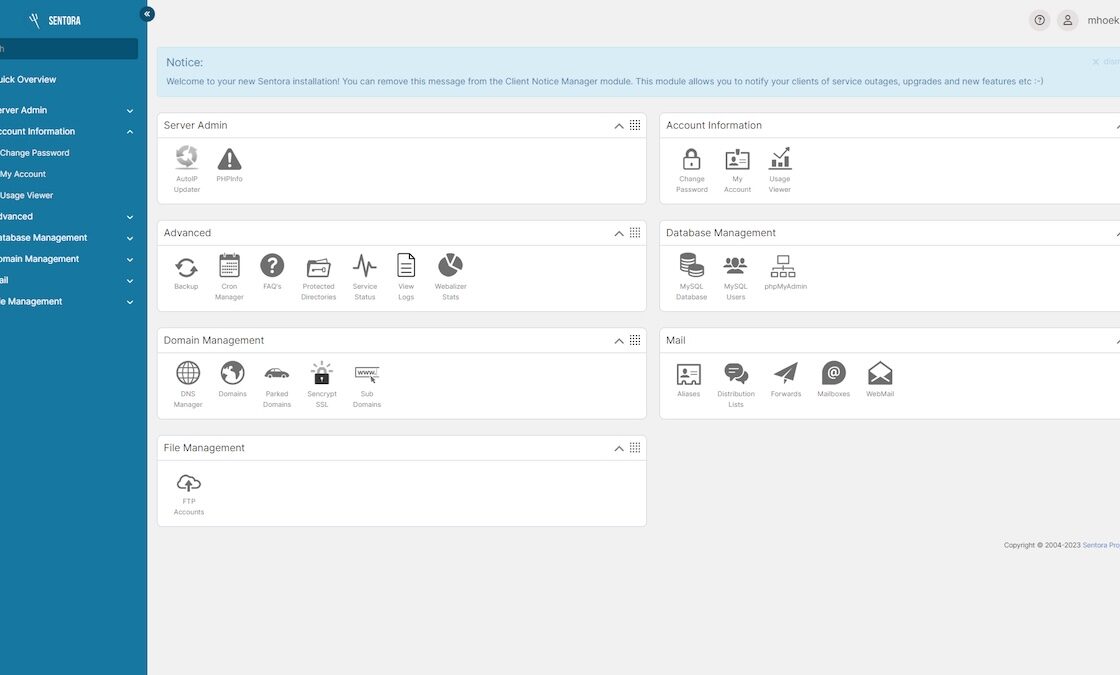
Sentora is a continuation of the ZPanel project and offers a basic, easy-to-use interface for hosting small-scale projects.
Supported Systems
- Ubuntu, CentOS.
Main Features
- Manage domains and subdomains
- Create email accounts
- Handle MySQL databases
- Configure FTP accounts
- Use a web-based file manager
Performance
Sentora is lightweight and uses minimal resources. It focuses on essential tasks, making it suitable for small servers.
Ease of Use
The interface appears dated but is simple to navigate. It is beginner-friendly for basic hosting needs.
Pros
- Lightweight and straightforward
- Easy for beginners
- Focuses on essential hosting features
Cons
- Dated interface
- Limited advanced features
- Small community for support
Installation Steps
- Start with a fresh Ubuntu or CentOS server.
- Update system packages, download the Sentora installer, run the installer:
sudo apt update && sudo apt upgrade
wget -O installer.sh https://sentora.org/install
sudo bash installer.sh- Follow the prompts to configure the setup.
- Access the panel at your server’s IP and assigned port.
- Log in with the admin credentials provided during installation.
Froxlor
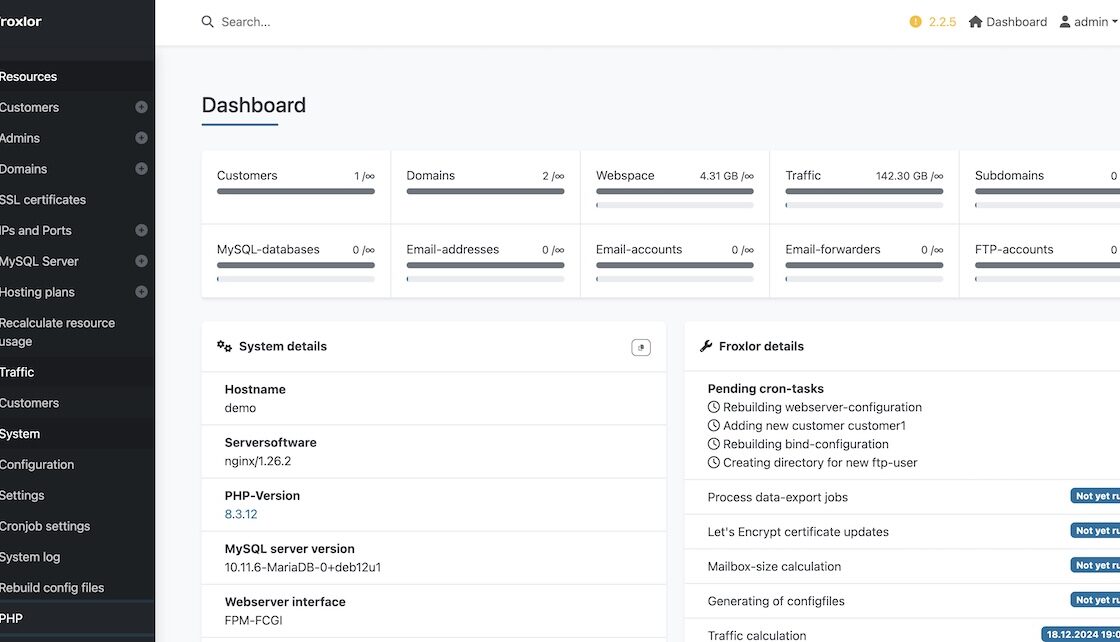
Froxlor is designed to be simple and lightweight, focusing on essential hosting features for small servers.
Supported Systems
- Debian, Ubuntu, Gentoo, and others.
Main Features
- Manage multiple customers and resellers
- Support for Apache or Nginx
- Add email accounts and DNS zones
- Handle databases with ease
- Enable SSL certificates
Performance
Froxlor uses minimal resources, making it ideal for low-resource servers. It performs well for small-scale hosting.
Ease of Use
The interface is clean and straightforward. Its simplicity makes it appealing to new users.
Pros
- Lightweight and efficient
- Easy to set up and use
- Suitable for small-scale hosting
Cons
- Limited features compared to modern panels
- Small community and fewer resources for troubleshooting
Installation Steps
- Start with a supported Linux system.
- Update the system packages, download Froxlor, and extract it into your web server’s root directory
sudo apt update && sudo apt upgrade
wget https://files.froxlor.org/releases/froxlor-latest.tar.gz
tar -xzf froxlor-latest.tar.gz -C /var/www/html- Access the installer by visiting your server’s IP in a browser.
- Follow the on-screen instructions to complete the setup.
YunoHost

YunoHost is tailored for self-hosting enthusiasts, offering a friendly interface and simple tools to manage personal online services.
Supported Systems
- Debian-based systems.
Main Features
- Install web apps like WordPress or Nextcloud with a few clicks
- Manage domains and DNS settings
- Handle email accounts
- Enable SSL certificates with ease
- Simplify user account management
Performance
YunoHost is efficient for small servers. Its performance depends on the number of apps installed, but it stays responsive with moderate use.
Ease of Use
The interface is intuitive and beginner-friendly, making it easy for non-technical users to manage self-hosting.
Pros
- Focuses on easy self-hosting
- Intuitive interface
- Large library of pre-configured apps
Cons
- Limited scalability for high-traffic environments
- Requires Debian-based systems
Installation Steps
- Start with a fresh Debian server.
- Follow the official installation steps from YunoHost, then run the post-installation script
:
curl https://install.yunohost.org | bash
yunohost tools postinstall- Access the panel at your server’s IP address.
- Log in and start adding domains and apps.
HestiaCP
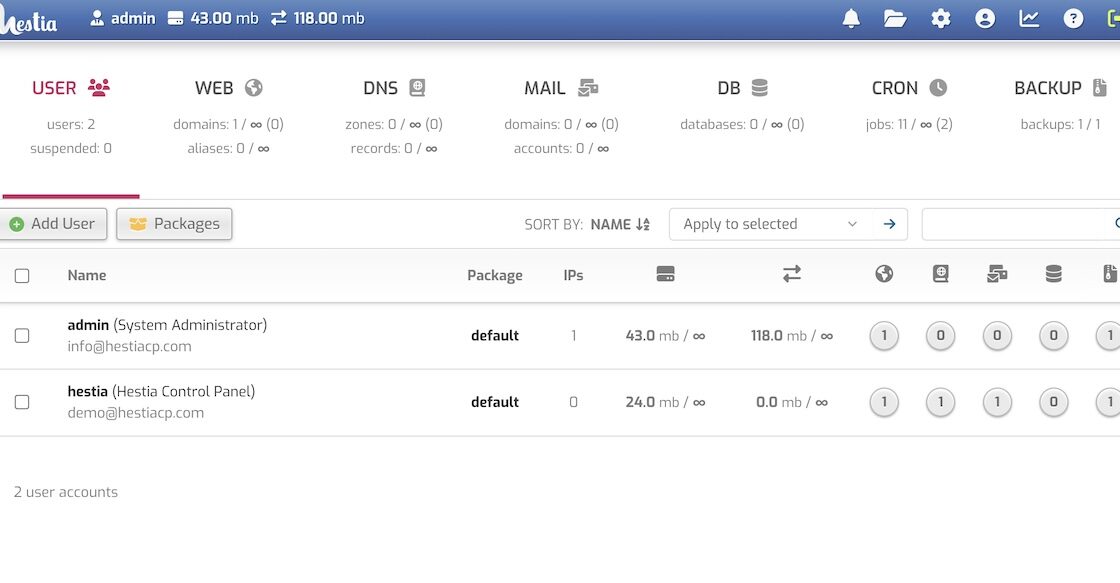
HestiaCP is a modern fork of VestaCP with an updated look and additional features. It supports Apache or Nginx with PHP-FPM for better performance.
Supported Systems
- Debian, Ubuntu.
Main Features
- Manage web domains and subdomains
- Handle email accounts and DNS settings
- Install SSL certificates with Let’s Encrypt
- Use Apache, Nginx, and PHP-FPM for optimized performance
- Create automated backups
Performance
HestiaCP is lightweight yet powerful, running efficiently on small to medium servers.
Ease of Use
The interface is modern and user-friendly. Clear labels and organized menus make it easy for beginners.
Pros
- Lightweight and fast
- Modern UI with clear navigation
- Excellent performance with Nginx and PHP-FPM
Cons
- Limited plugins compared to other panels
- Small but growing community
Installation Steps
- Start with a fresh Debian or Ubuntu system.
- Update system packages, download the HestiaCP installer, and run the installer
sudo apt update && sudo apt upgrade
wget https://raw.githubusercontent.com/hestiacp/hestiacp/release/install/hst-install.sh
sudo bash hst-install.sh- Follow the prompts during installation.
- After completion, access the panel at your server’s IP and port 8083.
- Log in with admin credentials provided during installation.
Ratings Comparison Table
| Control Panel | Ease of Use | Performance | Customizability | Features |
|---|---|---|---|---|
| CyberPanel | ★★★★☆ | ★★★★☆ | ★★★☆☆ | ★★★★☆ |
| aaPanel | ★★★★★ | ★★★★☆ | ★★★☆☆ | ★★★★☆ |
| Webmin/Virtualmin | ★★☆☆☆ | ★★★★☆ | ★★★★★ | ★★★★★ |
| ISPConfig | ★★★★☆ | ★★★★☆ | ★★★☆☆ | ★★★☆☆ |
| Ajenti | ★★★★☆ | ★★★★☆ | ★★★☆☆ | ★★★☆☆ |
| CWP | ★★★☆☆ | ★★★★☆ | ★★★★☆ | ★★★★☆ |
| VestaCP | ★★★★★ | ★★★★☆ | ★★★☆☆ | ★★★☆☆ |
| Sentora | ★★★★☆ | ★★★☆☆ | ★★☆☆☆ | ★★☆☆☆ |
| Froxlor | ★★★★☆ | ★★★★☆ | ★★★☆☆ | ★★★☆☆ |
| YunoHost | ★★★★★ | ★★★★☆ | ★★★☆☆ | ★★★☆☆ |
| HestiaCP | ★★★★☆ | ★★★★☆ | ★★★☆☆ | ★★★★☆ |
If you are looking for professional help, feel free to contact: me@zoheb.org