How to Change the Domain Name of a WordPress Site
Changing your WordPress site’s domain name is a significant undertaking, requiring meticulous planning and precise execution. This comprehensive guide will take you through each step, from updating settings to configuring redirects, ensuring a seamless transition.
Step 1: Prepare Your New Domain
- Purchase and Register Your New Domain: First things first, make sure you have your new domain name registered and ready for use.
- Update DNS Settings: You’ll need to point the new domain to your web hosting server. This typically involves setting up an A record with your hosting provider.
Step 2: Update WordPress Settings
Note: After making these changes, your site will be temporarily inaccessible.
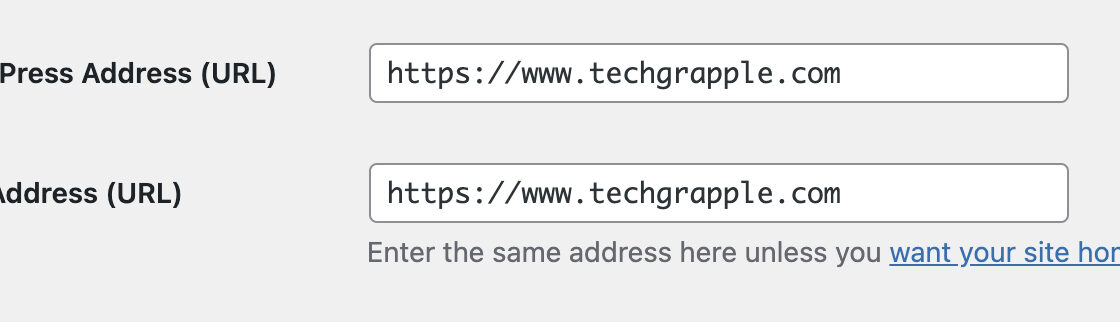
- Log in to the WordPress Admin Panel.
- Navigate to Settings > General.
- Change the WordPress Address (URL) and Site Address (URL) to the new domain URL. If you don’t do it before taking a backup, your site might go into an infinite loop.
- Save Changes.
Step 3: Backup Your Site
Backup the Root Directory
- Identify the Root Directory: This is where your
wp-config.phpfile is located. - Using Hosting Panel: If your hosting panel supports it, select all files in the root directory, zip them, and download the zip file.
- Using FTP Client: Use an FTP client like FileZilla. Log in with your FTP credentials and download all files from the root directory.
Backup the Database
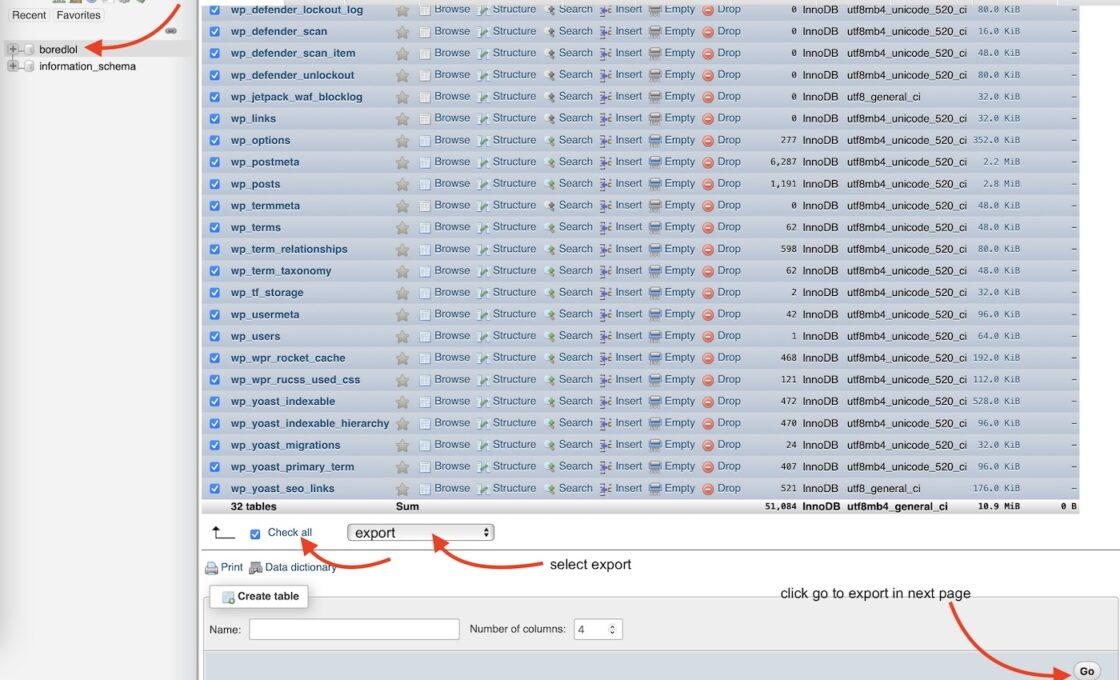
- Log in to phpMyAdmin: Access phpMyAdmin through your hosting control panel.
- Select Your Database: Choose your WordPress database from the left-hand sidebar.
- Export the Database: Click on the Export tab, select the export method (Quick or Custom), and click Go to download the SQL file.
Step 4: Upload Files to the New Domain
- Log in to Your Hosting Control Panel: Access the file manager or use an FTP client.
- Upload the Backup Files: Navigate to the root directory of the new domain and upload the backup files, unzipping them if necessary.
Step 5: Create and Import a New Database
- Create a New Database: In your hosting control panel, set up a new MySQL database. Note the database name, user, and password.
- Import the Database:
- Via Hosting Panel: Some hosting providers offer direct import options.
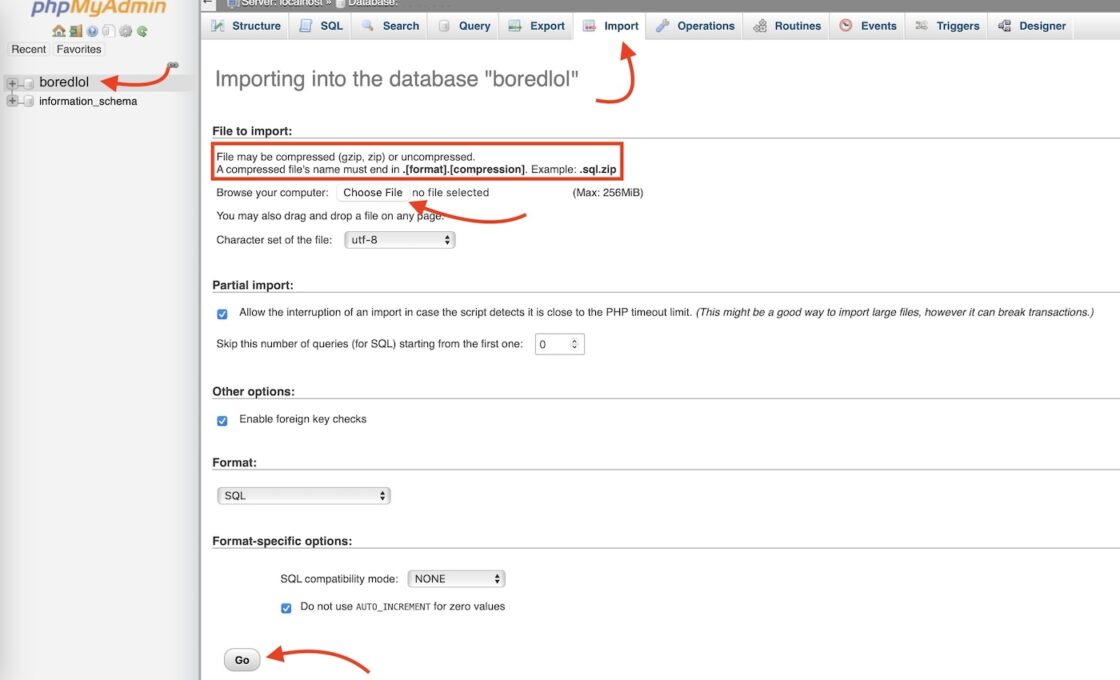
- Via phpMyAdmin: Log in to phpMyAdmin with the new database credentials, select the new database, go to the Import tab, choose the SQL file from the backup, and click Go.
Step 6: Update wp-config.php
- Navigate to the Root Directory: Locate the
wp-config.phpfile. - Edit Database Credentials: Open
wp-config.phpin a text editor and update the following lines with your new database details. Save it and upload back to your root directory
define('DB_NAME', 'new_database_name');
define('DB_USER', 'new_database_user');
define('DB_PASSWORD', 'new_database_password');
define('DB_HOST', 'localhost'); // Typically, this remains 'localhost'
Step 7: Verify and Update URLs
- Access Your Site: Visit your new domain URL to check if the site loads correctly.
- Log in to the WordPress Admin Panel:
- Navigate to Settings > General: Ensure the WordPress Address and Site Address are set to the new domain URL.
- Update All URLs: Use a plugin like Better Search Replace to update all instances of the old URL in your database, including post content, meta descriptions, and any hardcoded URLs.
Step 8: Set Up Redirects
To maintain your SEO and ensure visitors to your old domain are redirected to the new one, set up 301 redirects.
For Nginx
- Edit Nginx Configuration:
server {
    listen 80;
    server_name old_domain.com www.old_domain.com;

    location / {
        return 301 https://www.new_domain.com$request_uri;
    }
}
For Apache
- Edit
.htaccessFile: Add the following lines to your.htaccessfile:
RewriteEngine On

# Redirect the root URL to the new domain
RewriteCond %{HTTP_HOST} ^(www\.)?old_domain\.com$ [NC]
RewriteRule ^$ https://www.new_domain.com/ [R=301,L]

# Redirect all subpages to the new domain, preserving the path
RewriteCond %{HTTP_HOST} ^(www\.)?old_domain\.com$ [NC]
RewriteRule ^(.*)$ https://www.new_domain.com/$1 [R=301,L]
Step 9: Test Everything
- Check URLs: Ensure all URLs are redirecting correctly and no links are broken.
- Test Functionality: Verify that all site functionalities, plugins, and themes are working correctly.
- Monitor Traffic: Use Google Analytics or another traffic monitoring tool to ensure traffic is being properly redirected and tracked.
Step 10: Update Anchors/Links
Use a plugin like Better Search Replace to update all instances of the old URL in your database. This includes post content, meta descriptions, and any hardcoded URLs. If you don’t want to use the plugin, you can use this PHP script. Upload it to your website’s root direct and name it anything you like, but must be .php in the end $findText option will have the URL or text you need to find and $replaceText will have the new URL or text you want to replace with. Set the batch size to even 5000 if you are using a dedicated host. Open the page https://www.example.com/replace.php (assuming you named it replace.php). Click on start replacing and wait for the process to complete. If you see no progress right-click and select inspect option. If you see 500 internal server error, that means there is nothing left to replace. Run the script again and again until 500 error is shown.
<?php
require('wp-load.php');  // Adjust the path if necessary to include WordPress functions.

$findText = 'www.old_domain.com';
$replaceText = 'www.new_domain.com';
$batchSize = 500;  // Number of posts to process at a time

if ($_SERVER['REQUEST_METHOD'] === 'POST') {
    global $wpdb;

    $offset = isset($_POST['offset']) ? intval($_POST['offset']) : 0;

    // Get the total number of posts that need updating
    $total = $wpdb->get_var(
        $wpdb->prepare(
            "SELECT COUNT(*) FROM {$wpdb->posts} WHERE post_status IN ('draft', 'publish') AND post_content LIKE %s",
            '%' . $wpdb->esc_like($findText) . '%'
        )
    );

    // Query the posts that need updating
    $posts = $wpdb->get_results(
        $wpdb->prepare(
            "SELECT ID, post_content FROM {$wpdb->posts} WHERE post_status IN ('draft', 'publish') AND post_content LIKE %s LIMIT %d OFFSET %d",
            '%' . $wpdb->esc_like($findText) . '%',
            $batchSize,
            $offset
        )
    );

    $updatedCount = 0;
    foreach ($posts as $post) {
        $new_content = str_replace($findText, $replaceText, $post->post_content);
        $wpdb->update($wpdb->posts, ['post_content' => $new_content], ['ID' => $post->ID]);
        $updatedCount++;
    }

    $progress = min(100, (($offset + $updatedCount) / $total) * 100);

    echo json_encode(['progress' => $progress, 'nextOffset' => $offset + $updatedCount]);
    exit;
}
?>

<html>
<head>
    <title>Update Script</title>
    <script src="https://code.jquery.com/jquery-3.7.1.min.js" integrity="sha256-/JqT3SQfawRcv/BIHPThkBvs0OEvtFFmqPF/lYI/Cxo=" crossorigin="anonymous"></script>
</head>
<body>

<button id="start">Start Replacing</button>
<div id="progressBar" style="background-color: #eee; width: 100%; height: 30px;">
    <div id="progress" style="background-color: #0073aa; width: 0; height: 100%;"></div>
</div>
<p id="log">Starting...</p>

<script>
$(document).ready(function(){
    $('#start').click(function() {
        processBatch(0);
    });

    function processBatch(offset) {
        $.post('replace-script.php', {offset: offset}, function(data) {
            let progress = data.progress;
            $('#progress').css('width', progress + '%');
            $('#log').text(`Processed: ${progress.toFixed(2)}%`);
            if (progress < 100) {
                processBatch(data.nextOffset);
            } else {
                $('#log').append("<br>All posts processed.");
            }
        }, 'json');
    }
});
</script>

</body>
</html>
Additional Considerations
- Update External Services: Notify external services and platforms (e.g., social media, email marketing tools) of the domain change.
- SEO and Analytics: Update your sitemap, notify Google Search Console of the domain change, and ensure your analytics tracking is updated to reflect the new domain.
Conclusion
Changing the domain name of your WordPress site involves several steps, from updating settings and backing up files to restoring databases and setting up redirects. By following this detailed guide, you can ensure a smooth transition while maintaining your site’s accessibility and SEO integrity.
Looking for Professional help? Send an email to: me@zoheb.org