How to Make Bootable USB Drive of Windows 10
Making a bootable USB drive of Windows 10, Windows 8 or Windows 7 could be frustrating for some people if they don’t have technical knowledge, but believe me it can’t be easier than I am going to explain here. I did told the process in my previous article how you can use Windows USB tool to make a bootable USB, but that process doesn’t work sometimes because of the bootsect issue.
These are the things you need to make a bootable USB drive:
1) Windows OS ISO File (Windows 10, Windows 8 and 8.1 or Windows 7)
2) A USB stick (minimum 4GB required)
3) A computer that have Windows OS installed
That’s all you need, and here is the steps to follow to make the Bootable USB drive of Windows 10, and this process also works on Windows 8, 8.1 and Windows 7.

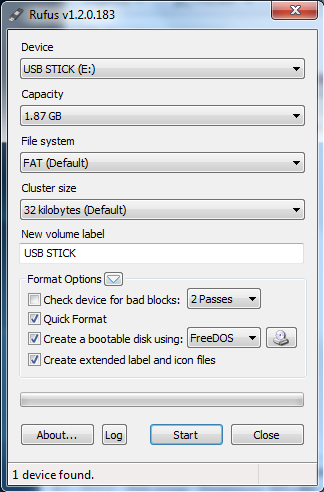
2) Once downloaded, connect the USB stick to your computer and open the Rufus USB tool app
3) Now the first option Device: USB stick drive should show up there. If it doesn’t, please check if USB is properly connected, and then check again. If USB is showing in my computer but not here. Click on the drop down box under device and select USB.
4) Nothing to do with capacity, File System should be FAT by default and you don’t need to change it.
5) Do nothing with any other option, just click on the CD drive icon (at the right side of FreeDos option)
6) Select the ISO file from your computer and put it here (You can browse and select the file when you click on CD drive icon)
7) Click on start (remember your USB stick drive will be formatted, and it does ask your permission to erase the drive, and you need to confirm it to proceed further)
Now what? Nothing, grab a cup of coffee/tea/cold drink and sit tight. 😛
It will show the process, and once done, you will see Done or Ready written at the bottom of the Rufus USB tool. Now you have a bootable USB Drive of Windows 10 or any other Windows OS what you have made.
