Many Ways to Capture a Screenshot on a Mac OS X
Mac doesn’t come with a Print Screen button like Windows computers. So you need to know the shortcut keys or the other options to take a screenshot on a Mac. Those already with a MacBook, iMac or any other OS X devices already know How to take screenshot on Mac. However, this guide could be very useful for those who are switching from a different platform (Windows or Linux) to Mac.
How to take a Screenshot on Mac? Or What is equivalent to Print Screen on a Mac ?
You can use the shortcut key to take a screenshot on Mac. Shortcut Keys can be used to take Full Screenshot of the display or a certain part of the screen. We will learn both.
1. Mac Screenshot (Full Screen)
You can simply press the key command+Shift+3. Please note that some Mac devices show command key as cmd.
Note: Whenever you take a screenshot on Mac, it saves it on Desktop. Location can be changed that we will talk about later.
2. Taking Screenshot of Current Active Window
Open any application or File that you want to capture as a screenshot. Press Command+Shift+4+Space Bar, and then click on the screen/display. The screenshot will be captured.
3. Taking Screenshot of a certain part of the display
Use the short cut key command+shift+4, move your fingers on trackpad/mouse to select the part you want to capture as a screenshot. Once you are ready to take the screenshot, let it go (remove your finger from trackpad).
Note : You can select the certain part moving three fingers on trackpad. If it doesn’t allow to do so, please enable three finger drag from System Preferences —- Accessibility —- Mouse & Trackpad —- Trackpad Options —- Enable Dragging —- Select Three Finger Drag from drop down —- Click OK. It will work now
4. Take a Screenshot on Mac using Preinstalled Grab Application
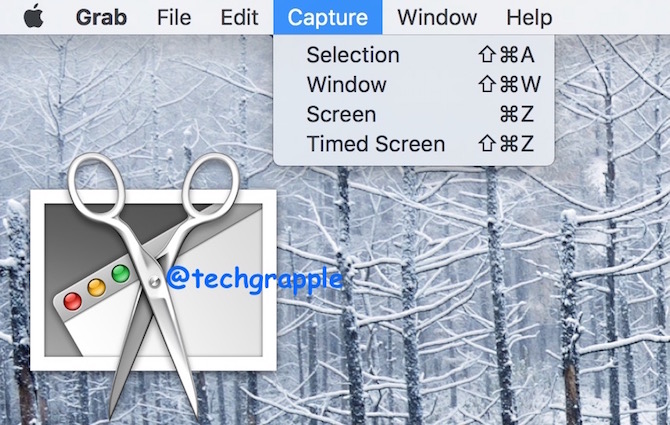
OS X also has an app known as Grab. To launch the app, Click on Launchpad –> Other –> Grab. Or go to Applications folder, and then Utility. Double click on Grab app to launch. Once it is opened, display will show nothing, but you can see an icon within Dock.
Now click on Capture in Menu (at the top left side) Select
- Screen : to capture whole display
- Selection : to capture only selected part of the screen
- Window : to capture the screenshot of a certain Windows or Application only. Whole screen will not captured
- Timed Screen : to capture the whole screen. Once you confirm to capture screen, it takes a few seconds, and then capture
When you use Grab app to capture screenshot on Mac, it pops up the image on the screen after taking screenshot. It needs to be saved manually clicking on File –> Save
How to Change Mac Screenshot Format
Mac Screenshots are saved as .PNG file by default. This format allows to capture images in high quality, but it increases the size of the captured image. If you want to send it to someone or use on your blog or website, this could be painful sometimes. So users usually change it to .JPG format. However, we will tell you to change it into all well known format.
Launch Terminal and type/Copy and paste one of these command as per your desired screenshot format.
- For JPG : defaults write com.apple.screencapture type JPG
- For GIF : defaults write com.apple.screencapture type GIF
- For TIF : defaults write com.apple.screencapture type TIF
- For BMP : defaults write com.apple.screencapture type BMP
You can revert back to PNG using this command; defaults write com.apple.screencapture type PNG
Note : If you are using older version of OS X, you may face trouble. So please add ;killall SystemUIServer (with Semi Colon) in the end of the command, just after file format (JPG/GIF etc..). Don’t use any space).
You can choose almost any image format, just change the last word of the command as image format. You can even use PDF format as a screenshot. Now you know how to take a screenshot on Mac. You can also change the default location to save them.
How to change default location to save Screenshots on Mac
- Launch Terminal
- Type this command
defaults write com.apple.screencapture location /Path/;killall SystemUIServer
Example : My MacBook Pro saves screenshots on desktop by default, and now I want it to be saved in Screenshots folder than I have created on Desktop. I will type the following command in terminal.
defaults write com.apple.screencapture location ~/Desktop/Screenshots/;killall SystemUIServer
If we still missed anything related to Mac Screenshot, please mention in comment.

