How to set up Adsense’s page-level ads for your blogs or websites
Google has now launched a new Page-level ads for Mobile Pages. This is to help bloggers to boost their revenue to earn little extra to keep them motivated, and work even harder to write informative articles. We will tell everything you should know about this new Adsense ads
What are Page-level Ads?
Page-level ads will be served only on Mobile Devices. Such ads will not be shown all the time. Google will serve these ads only when the it makes sense. There are 2 types of Page-level ads that you can serve;
1. Anchor/overlay ads
Such ads will be served at the bottom of the mobile pages that users can close if they want.

Such ads will appear on the mobile’s full screen with a close button. Users can easily tap on close button to dismiss the ad. Don’t get confused between Vignette ads and pop-up ads. It won’t open many pop-up windows to annoy visitors. This ad will appear when user click on an article to read. They will be taken to the article page and an ad will cover the article. Readers can simply tap close button and continue reading the article.
How to setup Page-Level Ads for your blogs including WordPress Platform
First of all you need to activate it under your Google Adsense account following these steps
- Visit Google Adsense
- Login with your Adsense ID and Password
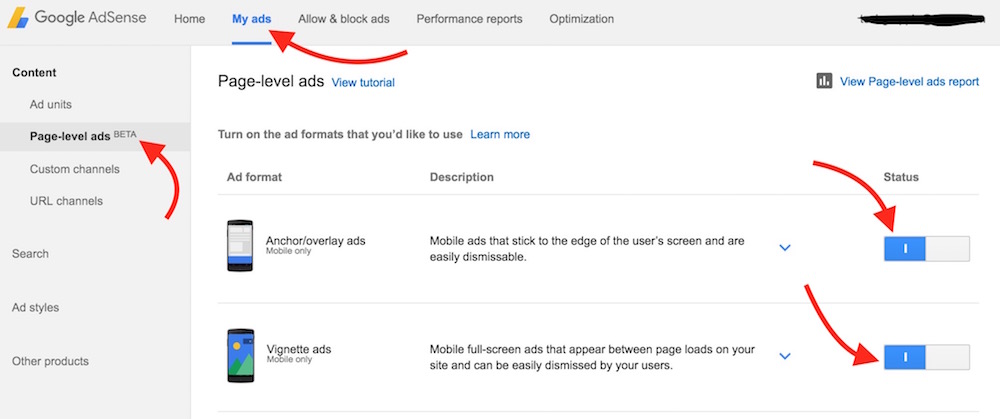
- Click My Ads
- Select Page-level Ads
- Now turn on one or both the ads. In the screenshot below both ads are turned on
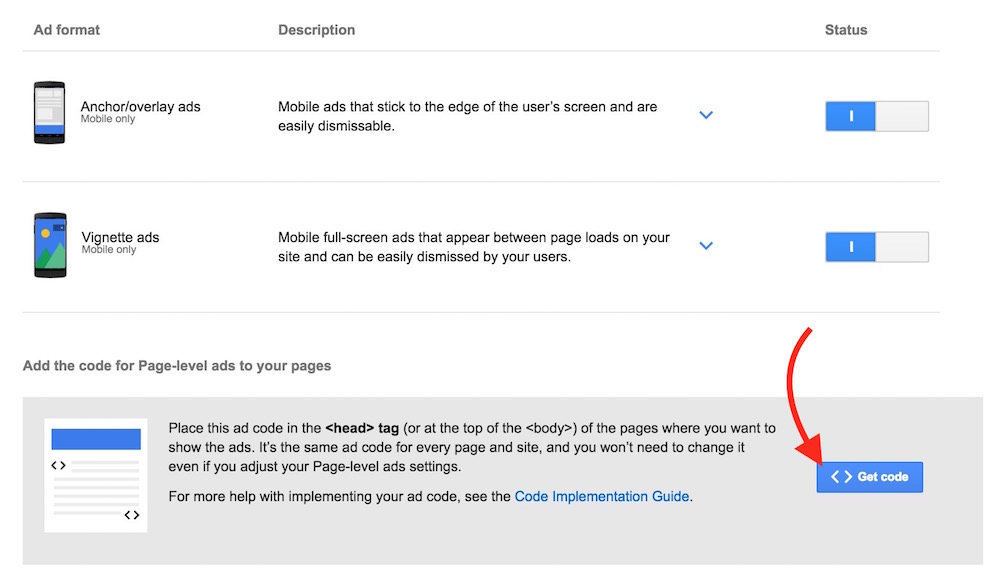
After you have activated page-level ads you need to get the code and add it on your blog
- You will get the get code option at the same place where you enabled page-level ads. Click on Get Code, and copy the ad tag
- One code will be enough for both the ad banners (Overlay and Vignette)
- Paste the ad code before </head> tag
- If you are running a blog on WordPress Platform, go to the Admin Panel –> Click Appearance –> Click Editor –> Click header.php. Now just paste the ad tag right before </head>, and save it
How to implement on Blogs running on BlogSpot
Now you already know how you can get the ad code and turn on page level ads on Adsense
- Make sure page level ads are turned on, and copy the ad tag
- Go to Blogger –> Template –> Backup your template, and click Edit HTML
- Place the Page-Level Ad tag right before </head> tag
- If you get error please make little modification in ad tag. Replace async with async=”
Now test the ad tag follow these steps.
How to test if Page-level ads are correctly added on your blog
After adding the tag, you may want to test if the ad tag is added correctly. Open your blog on mobile browser adding #googleads in the end of the URL, e.g. https://www.techgrapple.com/#googleads. You must use mobile device to test, else it won’t work.
How about ad limits, I already serve 3 Adsense banners per page
As we said, page-level ads will be served on mobile devices only, so those who browse via a computer will see nothing new. However, Mobile users will see those ads, but don’t worry. These ads are additional and won’t be counted in your ad banners limit. You can learn more about how many Adsense ads you can serve in our other article.

Related; Learn to make more money with Google Adsense


May 12, 2016 @ 4:55 am
Its Not working on my blogger website !!
I Need help.
May 12, 2016 @ 11:56 am
Make sure you have enabled the feature under your Adsense account. Did you get any error? Try adding it Just after tag or just before tag.
May 13, 2016 @ 2:39 am
I am not getting any error..
there is no body tag in my template..
I placed the code below .
May 13, 2016 @ 11:05 am
I have updated the article adding Blogspot section. Please check and try to implement the ad tag. Test the ad tag following the provided method (you must test on mobile only)